Defence off the back of lineouts
Set-up
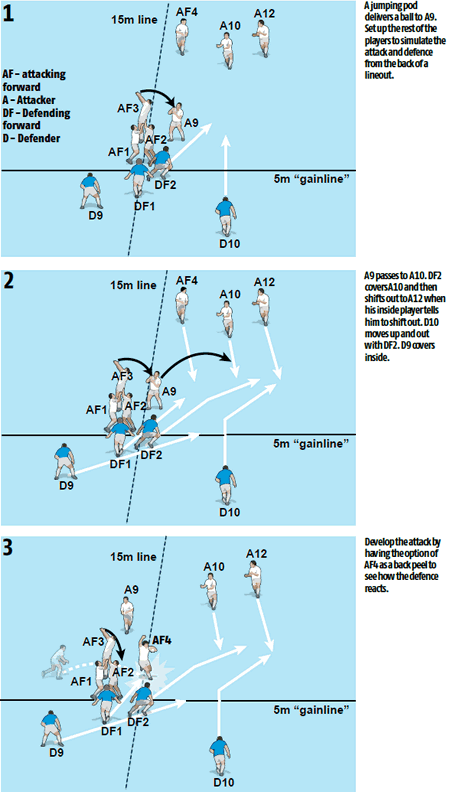
Set up seven attackers and four defenders as in picture 1, on a 15m line with a 5m line to indicate a “gainline”.
What you get your players to do
AF3 delivers the ball off the top of a simulated lineout, supported by AF1 and AF2 (see picture 1). A9 can run or pass to either AF4 who is 10m behind, or to A10 or A12 who try to get as far over the gain line as they can before being tagged on their inside hip (two hands). DF2 at the back of the line out is the “flyer” and tracks A10 and A12 immediately after the ball is delivered (see picture 2). DF1 – one in from the back - looks to cover the back peel or A9 running himself (see picture 3). Once that threat has gone, he must cover the inside pass, scissors or step inside the “flyer”. D9 half tracks across too, inside the ball, but slightly deeper. His role is to cover an inside switch, a break or an offload. He must also be prepared to cut off the wide out flank break. D10 must look to come up as soon as the ball comes off the top and apply pressure on his opposite man first and A12 once a pass is complete.
Encourage
Defenders staying 1-2m inside the attackers hips/ball. The defenders tracking across and reducing gaps between themselves. Defenders talking to the man in front of them to reassure them they are there and who they are tackling.
Development
Allow more attackers. Allow the forward attacker to come from a back peel position. Allow a catch and drive first.
Newsletter Sign Up
Coaches Testimonials

Gerald Kearney, Downtown Las Vegas Soccer Club

Paul Butler, Florida, USA

Rick Shields, Springboro, USA

Tony Green, Pierrefonds Titans, Quebec, Canada
Subscribe Today
Be a more effective, more successful rugby coach
In a recent survey 89% of subscribers said Rugby Coach Weekly makes them more confident, 91% said Rugby Coach Weekly makes them a more effective coach and 93% said Rugby Coach Weekly makes them more inspired.
Get Weekly Inspiration
All the latest techniques and approaches
Rugby Coach Weekly offers proven and easy to use rugby drills, coaching sessions, practice plans, small-sided games, warm-ups, training tips and advice.
We've been at the cutting edge of rugby coaching since we launched in 2005, creating resources for the grassroots youth coach, following best practice from around the world and insights from the professional game.

