John Mitchell on creating quicker ruck ball
Rucking & Maulingby John Mitchell
It is not the “clean” but the ball placement, and what goes before, that is the most important skill to work on in the ruck. Accuracy before and into the contact area and great execution are more important than “emotional” rucking.
Excellent ball placement comes from ball freedom. The supporting players must know their roles to secure the ball.
The ball carrier needs to win the tackle contest if he has to take a tackle in the first place. The main error that the ball carrier makes is that he does not give the ball freedom in the contact. That means it becomes the ball and not the body that makes contact with the tackler and any tackle assists. If that happens, he now has to fight with the tackler and his team mates before he can possibly place the ball back to his own team.
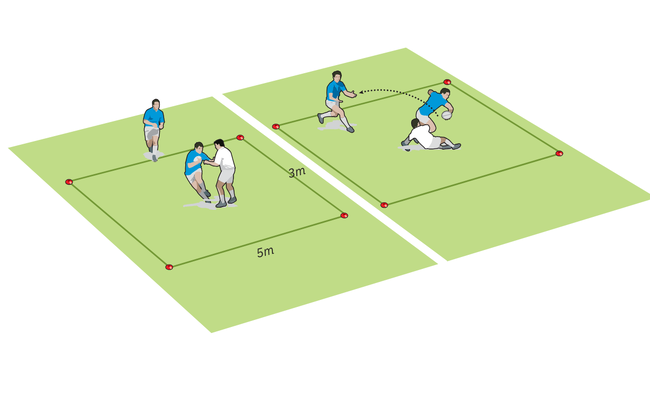
To create freedom, the ball carrier first uses evasive skills in front of the tackler. His lead foot and same shoulder move quickly into the likely contact therefore vitally winning the crucial last few inches before contact. In the meantime, the ball, ideally being kept in two hands, is moved to the other hip.
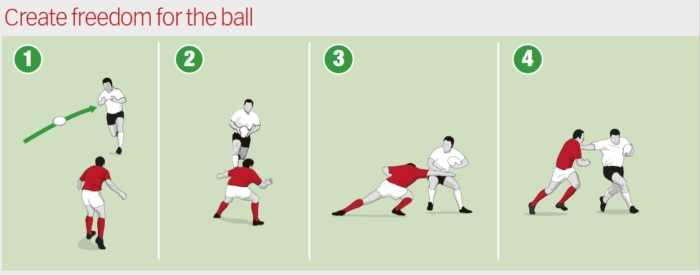
So, while he is still running up the pitch, he is aiming to take the engagement at the side. If he does take the engagement, he needs to use shorter steps to create good leg drive.
The arm on the impact side of the body can be used to fend or manage the contact, but that does depend on the height of the tackle. However, if the ball carrier can stay on his feet, he should be able to offload the ball to his supporting player.
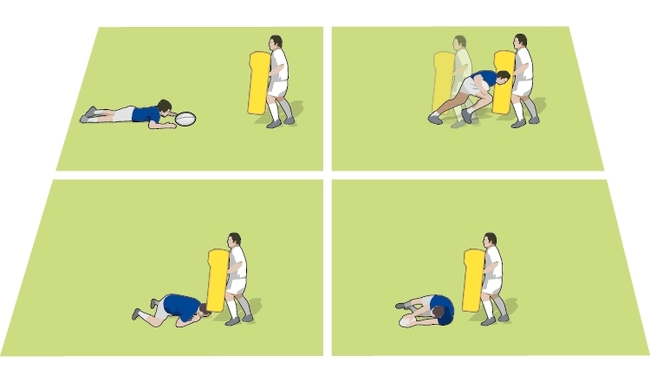
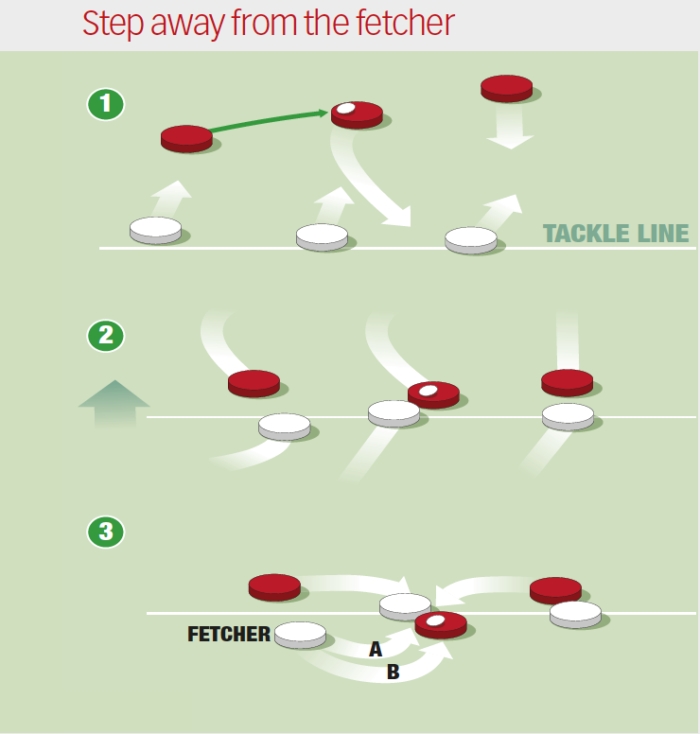
Otherwise, if he is tackled, because he has “freedom” with the ball, he can place the ball back very quickly. If he has used his footwork correctly, he has stepped to one side of the potential opposition “fetcher”. This player now has to step across and back through the tackle gate before he goes for the ball.
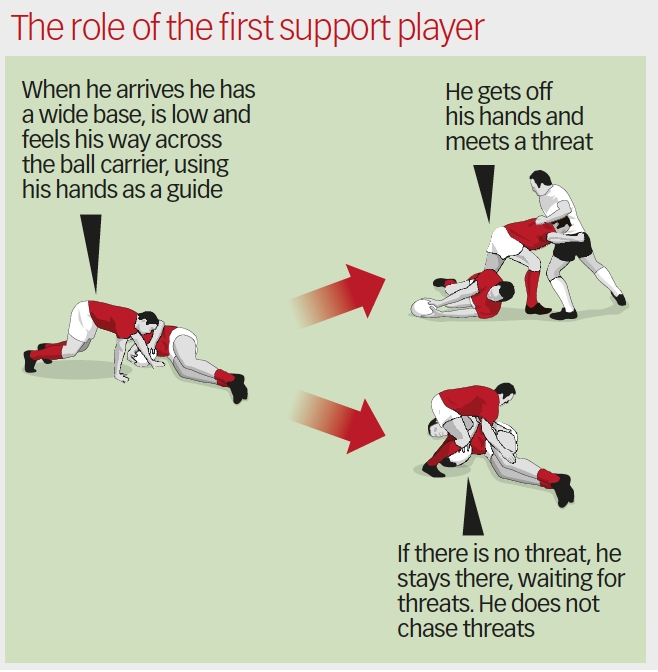
The first attacking player needs to focus on taking the space over the ball. Notice the emphasis here. He is not targeting any threats. That does not mean he will not have to deal with threats to the ball, but he is not focused on moving towards them – he is over the ball instead.
The height of arrival is important. He has to have a wide base, wide hands, with lots of knee bend. His hands act as a guide, like a blind man’s stick, feeling his way over the prone body and ball. In the meantime, his head is up, scanning for threats. In this process he might have to put his hands on the ground to maintain some balance before returning to his feet.
This role of the support player has evolved for me. I used to want the first support player to take out the threat. Now, he is focused on getting over the ball.
With a player over the ball, the real danger to your ball security comes from the “fetcher”, either being in a simultaneous battle for the space or arriving to clear away the first support player. If the opposition do not send in a fetcher or are too slow, then this player can clear the ball immediately (pass or pick and go).
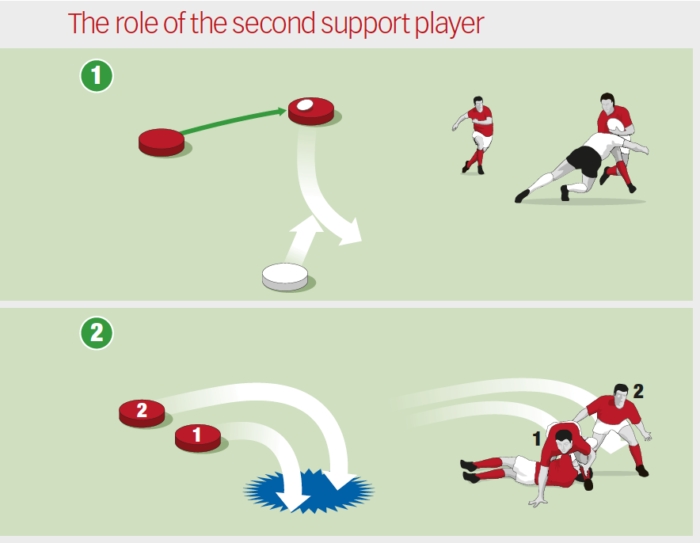
If required though, the second support player runs an “outside” line, coming in from the far side of the tackle. He targets the outside leg of their fetcher, aiming to get him off his feet as soon as possible and therefore, in the eyes of the referee, out of the game.
The third support player to the breakdown should take the same line as the second, working out whether he can keep the ball moving or go in to the secure the ball.
However, it is important he does not go in unless he is really needed. Otherwise he might be chasing a lost cause and perhaps go off his feet.
FOCUS
Excellent ball placement comes from ball freedom. The supporting players must know their roles to secure the ball.
KEY FACTORS
- Avoid ball before the body in the contact.
- Take contact on your terms with the right footwork. Get to the side of the tackler to make it more difficult for their fetcher to grab the ball.
- The first support player does not target threats, instead, he targets the space over the ball.
- The second support player works to the outside of the first support player.
KEY TAKEAWAYS
- Stop concentrating on the threat at the tackle – get over and past the ball.
- The second support player, if he has to, needs to use the hooks and handles on the threat to take him off his feet (and out of the game).
- The All Blacks have the best ball security and do not have to commit as many numbers as their opponents to the breakdown.
The role of the ball carrier
The ball carrier needs to win the tackle contest if he has to take a tackle in the first place. The main error that the ball carrier makes is that he does not give the ball freedom in the contact. That means it becomes the ball and not the body that makes contact with the tackler and any tackle assists. If that happens, he now has to fight with the tackler and his team mates before he can possibly place the ball back to his own team.
To create freedom, the ball carrier first uses evasive skills in front of the tackler. His lead foot and same shoulder move quickly into the likely contact therefore vitally winning the crucial last few inches before contact. In the meantime, the ball, ideally being kept in two hands, is moved to the other hip.

- Attack the ball and engage the defender
- Use evasive skills just before the defender
- Get the lead foot and same shoulder to move into a likely contact, shifting the ball to far hip
- Ideally carry the ball in two hands, but use the free arm to fend or manage the contact depending on the height of the tackle
So, while he is still running up the pitch, he is aiming to take the engagement at the side. If he does take the engagement, he needs to use shorter steps to create good leg drive.
The arm on the impact side of the body can be used to fend or manage the contact, but that does depend on the height of the tackle. However, if the ball carrier can stay on his feet, he should be able to offload the ball to his supporting player.
Otherwise, if he is tackled, because he has “freedom” with the ball, he can place the ball back very quickly. If he has used his footwork correctly, he has stepped to one side of the potential opposition “fetcher”. This player now has to step across and back through the tackle gate before he goes for the ball.

- As the ball carrier takes the ball he aims to beat the defender
- Good footwork puts him outside the tackler
- The fetcher coming from the inside has to go through the gate to get to the ball. If the ball carrier is tackled on the tackle line, then the fetcher can run the shorter line “A”. If the ball carrier gets beyond this line, the fetcher has further to go: “B”.
The role of the first support player
The first attacking player needs to focus on taking the space over the ball. Notice the emphasis here. He is not targeting any threats. That does not mean he will not have to deal with threats to the ball, but he is not focused on moving towards them – he is over the ball instead.
The height of arrival is important. He has to have a wide base, wide hands, with lots of knee bend. His hands act as a guide, like a blind man’s stick, feeling his way over the prone body and ball. In the meantime, his head is up, scanning for threats. In this process he might have to put his hands on the ground to maintain some balance before returning to his feet.
This role of the support player has evolved for me. I used to want the first support player to take out the threat. Now, he is focused on getting over the ball.

The new role of the second support player
With a player over the ball, the real danger to your ball security comes from the “fetcher”, either being in a simultaneous battle for the space or arriving to clear away the first support player. If the opposition do not send in a fetcher or are too slow, then this player can clear the ball immediately (pass or pick and go).
If required though, the second support player runs an “outside” line, coming in from the far side of the tackle. He targets the outside leg of their fetcher, aiming to get him off his feet as soon as possible and therefore, in the eyes of the referee, out of the game.
The third support player to the breakdown should take the same line as the second, working out whether he can keep the ball moving or go in to the secure the ball.
However, it is important he does not go in unless he is really needed. Otherwise he might be chasing a lost cause and perhaps go off his feet.

- A tackle is made
- The first support player gets over the ball. The second support player has to decide whether he can pick and go OR protect against a “fetcher”. In which case, he goes OUTSIDE the first supporter.
Newsletter Sign Up
Coaches Testimonials
Gerald Kearney, Downtown Las Vegas Soccer Club

Paul Butler, Florida, USA

Rick Shields, Springboro, USA

Tony Green, Pierrefonds Titans, Quebec, Canada
Subscribe Today
Be a more effective, more successful rugby coach
In a recent survey 89% of subscribers said Rugby Coach Weekly makes them more confident, 91% said Rugby Coach Weekly makes them a more effective coach and 93% said Rugby Coach Weekly makes them more inspired.
Get Weekly Inspiration
All the latest techniques and approaches
Rugby Coach Weekly offers proven and easy to use rugby drills, coaching sessions, practice plans, small-sided games, warm-ups, training tips and advice.
We've been at the cutting edge of rugby coaching since we launched in 2005, creating resources for the grassroots youth coach, following best practice from around the world and insights from the professional game.
